You can often run into some small or large plumbing issues at home. And having to call a plumber to solve it comes with a very large bill. In such cases, DIY plumbing is the way to go. A basin wrench is a great tool for any DIY plumber. But the question is, how do you use a basin wrench for DIY plumbing?
The basin wrench is used for the installation or removal of kitchen or bathroom sinks. Due to its long shaft, you can use it in a hard-to-reach spot underneath the sink. You start by positioning the wrench correctly and then fitting it onto the mounting nut. Once it’s set into position, just turn it around and tighten it up.
But there is more DIY plumbing that the basin wrench can help you with. And though I gave you a basic idea of how to use a basin wrench, there are some nuances to using a basin wrench. In this article, I will go over in detail how to use a basin wrench. So, I recommend reading the article till the end.
What Is the Basin Wrench Used For?
The main purpose of a basin wrench is the installation or removal of bathroom or kitchen sink faucets. It is specifically designed for this due to its long shaft, allowing you to reach the hard-to-reach mounting nuts underneath your sink, which are usually hard to get to using traditional pliers or wrenches.
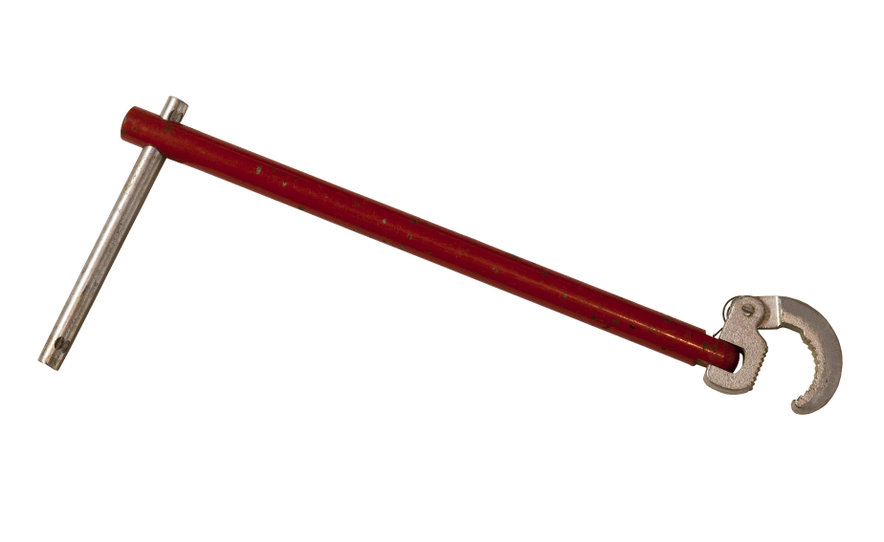
The basin wrench comes fitted with a claw head, which is a spring-loaded pivoting wrench head. This claw-like head swivels 180 degrees, allowing you to better position it depending on the mounting nut that you are working with. It can also be adjusted to be either clockwise or counterclockwise if you want to tighten or loosen the nuts.
The shaft of most Basin wrenches is either one-piece or telescopic for more range. Either way, they are at least 10 inches long to help you easily reach the normally difficult-to-reach nuts.
How To Use A Basin Wrench For Plumbing?
The basin wrench is one of the most useful tools that you can have when it comes to DIY plumbing. The long shaft of the wrench is specifically designed to help you with the usually inaccessible mounting nuts. This makes them much easier to install or remove while installing your faucet. But how do you properly use one?
For the sake of simplicity, you can break up the process of using a basin wrench into 3 simple steps.
Step-1: Positioning Your Wrench
First and foremost, you need to make sure it is positioned correctly. For either tightening or loosening, depending on what you require. The basin wrench can swivel so that it can be used for both tightening and loosening. You want to make this change before getting under the sink.
After that, you hold the wrench correctly with the head of the wrench on the top. Depending on what you are trying to do, the position of the claw opening will vary. When removing a faucet, the opening of the claw should face the right. Once, you attach it to the nut and turn it counterclockwise to loosen it.
On the other hand, when attaching a faucet, the opening will face toward the left. And when you attach it to the nut, you will need to turn it clockwise to tighten it up
Step-2: Fit It To The Mounting
Once you are under the sink, move the wrench to the bottom of the sink. Its long shaft should make it quite easy to reach this usually hard-to-reach area. Once there, position the claw of the wrench around the mounting nut.
Position the claw so that it grips the nut notches firmly. You are free to reposition the claw later at any time to get more comfortable with the turning motion. Considering how cramped it can be under the sink this can be a lifesaver.
Step-3: Turning Your Wrench
At the bottom of the wrench shaft, there should be a small perpendicular bar known as the T-bar. Now, using the T-bar and both your hands, you can turn the wrench. The T-bar should give you more leverage than you would normally get from just turning the shaft. The T-bar can even slide to the other side of the shaft for more room.
Some DIY Issues And How To Solve Them
With the above-mentioned steps, you should be able to loosen or tighten any mounting nuts for your faucets. When it comes to any DIY work, some issues may arise considering you are not a professional. But that does not always mean you should call a plumber. Let us look at some troubleshooting that you can do on your own.
When trying to reach a mounting nut, if you can reach it using a standard wrench, I would still recommend using a telescopic wrench. This will give you a few extra inches to work with to reach any of the harder-to-reach nuts.
In some cases, a few nuts can be difficult to turn using your basin wrench, which may be due to corrosion or how old the mounting nut is. In this situation, you can use penetration oils to loosen it up for you.
However, some corroded mounting nuts will not budge even after using penetration oils. In such a situation, you may have to cut the faucet off from the sink. This will be a more difficult task and will require you to use a hand saw or a reciprocating saw to cut through the threading.
Another problem you could face while working under your sink is a shortage of space. In such a situation, it may be more worthwhile to remove the p-trap. This should free up enough space for you to work more comfortably under the sink.
A tip that can come in handy when installing a new sink or replacing a new sink is to directly install the faucet to the sink. This is easier than doing it after placing the sink in, saving you from trying to reach it from underneath.
DIY Plumbing Safety Tips
Much like any other DIY project safe is paramount. You do not want your do-it-yourself (DIY) project to do yourself in (DYI). For this reason, you should try and follow some safety tips to keep you out of trouble.
- Before doing anything, you should read the labels, especially the warning labels. They can often save you from losing a finger.
- When working with plumbing, you should be extra cautious about electrical current. Make sure to shut off the electricity if you plan on working near a power source.
- Gloves are very important when doing DIY plumbing. They can protect you from hot water, your tools, and chemicals that may be present.
- You should know everything about the pipes in your house so that you know which pipes connect to what and where shut-off valves are. That way, in an emergency, you can shut it off right away.
- Always keep a list of emergency numbers on hand, especially for a professional plumber. You never know when you will need help.
In this article, I went over how you can use a basin wrench in your DIY projects. I discussed a little bit about what it is used for and how you can use it, including some troubleshooting tips and safety precautions you should take while doing your DIY endeavors. Thank you for reading the article. I wish you the best of luck on your project and goodbye.